Tuesday, September 6, 2011

Wine Corks and Bedroom Update


Hello!! It’s Robyn here and I back with more decorating projects! I have been collecting wine corks for years and several people have given me bags of them. I really think they are very unique and fun!  I have been thinking about what to do with them and finally decided to check out Pinterest…of course! I saw this very simple idea and knew I could do it easily. My kind of project!

wine cork centerpiece

Look at these beauties!

DSC05614(rev 1)

I had a small ice bucket that I never use and put a small white candle in the middle.

DSC05613(rev 1)

I placed the whole thing on a silver tray I got as a wedding gift and a touch of green of course! Love it!

DSC05615(rev 1)DSC05616(rev 1)

I am still slowly working on new rooms in our house. Our master bedroom (check out more photos here) is very light. We do not have curtains yet, but we live in the middle of isolated field so it doesn’t really matter! I spray painted two candle scones white to put on either side of this picture.  It is hard to tell from the pictures, but you can actually see them. The walls are actually really light blue even though they look white in the pictures.

DSC05636(rev 1)DSC05639(rev 1)DSC05640(rev 1)

You can’t tell from the photos, but the duvet cover has touches of gold. I really want to add some gold to spice up the décor. I added this vase and candle because I already had them. What else could I add? I was thinking a small gold pillow and throw for the bed,but I am not sure. What do you think?


DSC05643(rev 1)

I love this coffee filter wreath that I made during the summer! Check it out here!

DSC05642(rev 1)

-Robyn

Sunday, September 4, 2011

Cute Halloween Craft

I know a lot of people made these last year I just thought I would show you how for the people that had not seen them yet.

Materials:
Old paperbacks (no good books were harmed in the making of this craft scouts honor!!)
glue
pumpkin face (I printed mine off of google but feel free to draw your own)
green pipe cleaners

1. start folding the pages including the cover in toward the middle

2. When you are done you should have something that looks like this you can glue the ends together if you need to. Also the thicker the book the better

3. Take your pipe cleaners and twist them around a pencil to create a little curly q stem

4. Cut out your pumpkin face out and glue it on the book

5. Insert your cute little stems in now


 6. And you have a wonderful recycled little pumpkin!


Carrie :)

Friday, September 2, 2011

Friday Favorites

Robyn's
I have really been thinking about changing a closet into a reading nook for Andrew. I just LOVE this idea!
Inspiration via Pinterest


Carrie's
This blueberry cobbler from Cat 
I want this whole outfit perfect for fall don't you think

The website is the boom diggity Craft Fail
Christy's

Favorite nurse sayings:
 Image Detail

Image Detail
Happy Weekend!

Thursday, September 1, 2011

Featured Blogger of The Week

 We welcome Jean from Eat Your Beans: A Vegan Mom Challenge  


Guest Blog Questions:

How long have you been blogging, and why did you start in the first place?
I started blogging this June (2011), I know, total newbie! After ordering at least 27 books on going vegan and another 33 on vegan recipes (and in turn upping my library’s circulation numbers), I decided I would go vegan for 3 weeks. The challenge started as a conversation with another friend and co-worker. After reading all of these books on going vegan I thought, well of course they can do it, they are (fill in the blank) rich, single, young, in a city where they can find the ingredients or a restaurant to cook them. Of course it’s easy for THEM! I thought it would be more of a challenge if a 39 year-old wife and mother of two who lives in a small rural town in the South tried to go vegan in a carnivorous household-on the cheap.
Since I am a frustrated writer, blogging about the challenge and how it affected my family was the way to go for me. Especially after discussing it with Carrie and seeing how feasible it was.

How long have you been vegan and why did you start in the first place?
 I was vegetarian for almost a year but went back to eating fish and fowl since it was easier to prepare one meal for everyone instead of two. I decided to go vegan this past June and have remained since I started the challenge.
To sum it up for anyone interested in the difference: a Vegetarian eats absolutely no meat of any kind, but does eat or use animal products such as milk, cheese, butter, honey, eggs, leather, silk, etc.
A vegan does not eat any meat OR any animal products and they typically try to avoid wearing them as well.
As far as why I went vegan, well I didn’t want to eat meat anymore; honestly it made me feel guilty, I still prepare food for my family but I doubt I could actually eat it again. As far as milk and eggs, did you know that we are the only mammals that drink another mammal’s milk, especially after we are weaned as babies? And eggs…think about it.
That’s not to say I don’t miss pizza, but I live without it just fine!

How to plan meal around the non-vegan members of your family?
That was the hardest part initially, but I am getting the hang of it. I try to make meatless meals at least once per week and when I do make meat for my family, I usually have plenty of homemade fake meat or bean protein sources for myself and we share the same sides. I have a ton of recipes on my site for anyone interested in trying a vegan meat alternative. I am also trying to promote Meatless Mondays at my house and on my blog.

Favorite guilty pleasure?
My life is a guilty pleasure! I work surrounded by books and get to play with toys in the children’s area! Since I have so many I will narrow them down to the top three: Watching the ‘Twilight’ series movies with my daughter and making inappropriate comments about the actors, aimlessly riding the Harley all day with my husband when the kids are in school, and making up new and ridiculous ‘Pirate’s of the Caribbean’ sequels with my son when I tuck him into bed. (And I too love stupid B Horror movies, lol)

What is on your blog?
I try to keep it varied. There is the music that I listen to only because I am an absolute junkie when it comes to all kinds of music. I just started putting on recycled crafts since I like to get creative every now and then. I have a ton of recipes for vegans, raw vegans and some juicing and smoothie recipes also. There is my general babbling about my home life and some pretty funny comments about the two challenges that I took, both 21 days long. I also like to put a new quote every day that has to do with my topic, sometimes silly and occasionally motivating or serious. I have a foodie section for those who are interested in what brands I use, I try to keep up with a weekly menu and last but not least a book review section that includes cookbooks and other books.


What do you have for us today?
I wanted to share a great recipe that is cheap and easy and even kid friendly. It is actually a recipe given to me by our coworker friend Pam and I ‘veganized’ it-that really cracks her up. Anyway, I added fake meatballs to the recipe and used only veggies and veggie stock. If you don’t want to bother making the fake meatballs, you can add a ½ cup of TVP (texturized veg protein) they sell it at Ingles grocery store in the baking isle.

Mexican Meatball Soup

1 tablespoon olive oil
1/2 small onion, chopped (about 1/2 cup)
2/3 cup uncooked long-grain brown rice
2-3  tablespoons chopped fresh cilantro
s & p to taste
1 carrot, chopped (about 3/4 cup)
1 teaspoon hot sauce (or more to taste)
1 Yukon gold potato, skin on and diced (about 1 cup)
2 tablespoon tomato paste or 3 tablespoons ketchup
8 cups of veggie stock
1 cup of your favorite salsa
2 small zucchini, diced or shredded
1 batch of mini meatballs or bean balls
In a heavy large pot, heat the oil over medium-high heat, add the onions and cook until translucent-about 5 minutes. Add the rest of the ingredients as listed to the pot except meatballs. If you are using TVP instead, add it now.
Bring to a boil and then simmer for 30 minutes. Add mini meatballs and heat through for another 20 minutes.
For the Mini Meatballs:
1 clove garlic
1 small onion, peeled (tangerine sized or equivalent)
1 1/2 cups cooked green or brown lentils, rinsed, drained (a 15 oz can is fine)
3 tablespoons nutritional yeast (or whole wheat flour or parm cheese if you're not vegan)
2 tablespoons vital wheat gluten flour (in baking isle)
2 tablespoons soy sauce
1 tablespoon tomato paste
1 teaspoon olive oil
2 tablespoons water
1/2 cup seasoned store-bought breadcrumbs
To make the mini meatballs:
We’re going to use the food processor fit with a metal S blade for most of the work here, so it should come together pretty quickly. First toss in the garlic and pulse until finely chopped. Now add the onion and pulse until minced. You don’t want any big pieces or they will ruin the texture of the meatball.
With a plastic spatula, transfer the onion/garlic mixture to a mixing bowl and set aside. It’s okay if some remnants are left, just try to get most of it.
Now in the food processor, pulse the lentils, nutritional yeast, wheat gluten, soy sauce, tomato paste, olive oil and water. Once everything gets mixed well, puree them until totally smooth, scraping down the sides to make sure you get everything.
Combine this mixture with the onion mixture and add in the breadcrumbs. Mix really well with your hands for about 2 minutes.
Preheat oven to 350 F.
Roll the meatballs into cherry sized balls, I got 32 meatballs out of this. This goes very fast if you keep your hands clean and dry (I was averaging one meat ball every 10 seconds.) Preheat a large skillet over medium heat and pour in a thin layer of olive oil. You don’t want to crowd the pan, so pan fry in two batches. You should be able to tilt the pan and have all the meatballs roll around and get coated in oil, cooking until browned (no more than 5 minutes.)
Transfer first batch to a baking pan, cook the second batch, and transfer all meatballs to the baking pan. Bake for 18 to 20 minutes, shaking the pan every once in awhile to toss the balls so that they cook evenly.

Thanks for having me on! You can find me and some more of my recipes at:

Wednesday, August 31, 2011

Wednesday is treat yourself day, YEAH!

This Wednesday I have a treat yourself idea. Well, actually it was for me but now I am sharing it with you.
So, I looked in the mirror while I was in my car and I thought its true objects do appear closer but then I realized I wasn't looking in my side view mirror. My pores were really that big and clogged and gross!  Just to top it off I have forehead wrinkles and one of those painful under the skin zits. Talk about a load of crap, is it even possible to have wrinkles and zits at once. I feel like Benjamin Buttons.( Ok, just in case you hate Brad Pitt, that's a movie his in. Where he is Old then Young. Anyway.) Since I have no room in my budget for a professional facial, I decided to make a homemade one out of fruit. So here is the recipe:


Strawberry Lemon Facial
Strawberries are a natural source of salicylic acid which is great for treating acne, the lemon to brighten the skin and yogurt is used to soothe the skin.


Ingredients:
1/4 cup strawberries (fresh, not frozen please)

1/4 non-flavored yogurt
1 tsp. Lemon juice

Preparation:
Blend together the strawberries, lemon juice and yogurt. Spread on face and wash after 10-15 minutes.

*During this relaxing time put your Zen music on ( You know that one artist who's voice takes you away, mine is Prince.) And really take the time to remember who you are, beautiful on the inside.

Well, I am going to go dance in the "Purple Rain" like its "1999".
Christy

Tuesday, August 30, 2011

Seeing Green

I have been going spray paint crazy lately! If you have followed my personal blog you would know that I have recently added on a whole first floor to our home. We are loving it and I am enjoying getting to decorate new spaces. We have a lot of brown, tan, and white going on and I have been dying to add more color. I decided to add some green in the living room and dining room. Spray paint was the obvious choice! So easy!
First I spray painted two vases. They were standard vases that you get from florist. I think I have 4!
This is what it looked like at first…
DSC05593(rev 1)
After a very quick coat of white!
DSC05594(rev 1)
For now it is in our Dining Room!
DSC05617(rev 1)DSC05618(rev 1)
I painted another one moss green and fell in love with the color.
DSC05605(rev 1)
It found a home on one of our bookshelves in the Living Room…
DSC05634(rev 1)
Notice the other splash of green? I had these votive candle holders from Southern Living and thought they would be easy to change…
DSC05595(rev 1)DSC05611(rev 1)
Then on to the candle holders…There are 2 of these on our mantle and they turned out so good!
DSC05599(rev 1)DSC05598(rev 1)
This is not a very good picture, but they are lovely in person! HA! I just need to get white candles and the look will be complete.DSC05612(rev 1)
The I had so many black iron pieces in our original house and I needed a change! This scrolly thing was painted black and placed in the kitchen. Again I was unable to get any good pictures b/c of the bright lights, but it is my FAVORITE!

DSC05601(rev 1)DSC05602(rev 1)DSC05622(rev 1)
I hope you enjoyed this little spray painting adventure!! Come back next Tuesday for fun with wine corks!!
Robyn

Monday, August 29, 2011

Fall Inspirations

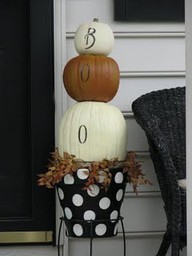
I love love love to decorate for fall 
 so today I thought I would show some of my inspirations 
 for my fall decor


I am so in love with it all I can't wait!!!!!!

What is your favorite season to decorate for?

Happy Monday
Carrie

image via pinterest